Minecraft Bridge - Building Your Perfect Crossing
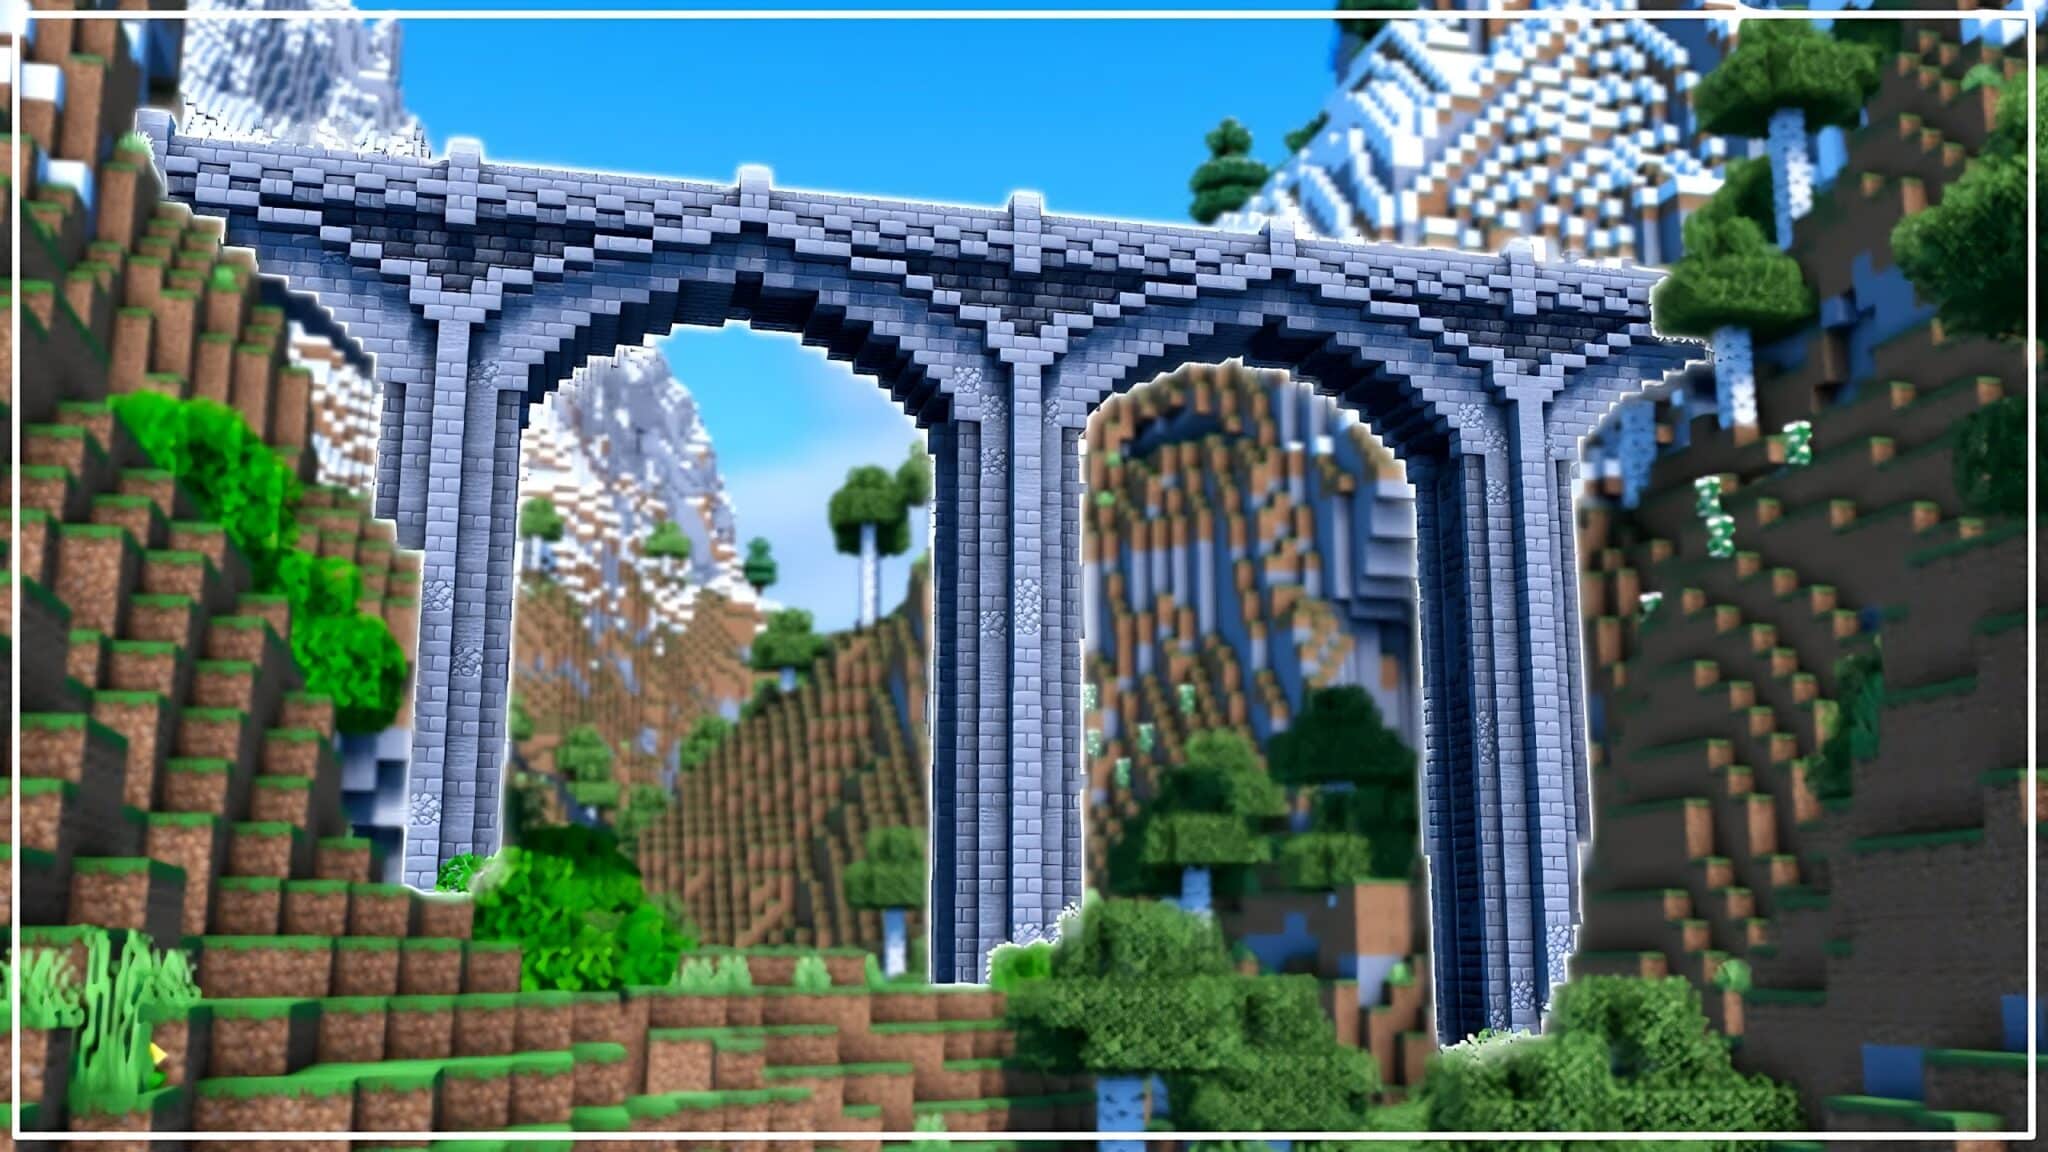
Building something truly impressive in your blocky world, especially a way to get from one place to another, can feel like a real accomplishment. Think about those times you've wanted to span a big gap, connect two landmasses, or simply make a pretty path across a tricky spot. A well-made bridge, in a way, becomes a centerpiece for your base or a vital link in your travels. It's more than just a path; it's a statement, a practical tool, and sometimes, a true work of art in your digital playground.
When you're trying to put together a sturdy connection over a void, you might wonder if there’s a better approach than just guessing where to place each piece. It’s a bit like trying to fit puzzle pieces together without seeing the full picture, isn't it? There are methods that can help you figure out the very best spots for your building materials, making sure your structure holds up and looks just right. This can really take the guesswork out of creating those important links in your world, letting you focus more on the fun parts of the build, too.
From simple paths to complex moving structures, the possibilities for creating these vital connections are pretty wide open. Whether you are aiming for something basic that just gets the job done, or something truly special that moves and changes, there are ways to approach it. We'll explore how to make these connections, what goes into building them, and even how players use them in competitions, just to give you a clearer picture of what's out there.
Table of Contents
- Building Your Minecraft Bridge - The Smart Way
- What is the Best Way to Plan a Minecraft Bridge?
- Advanced Minecraft Bridge Ideas
- Creating a Retractable Minecraft Bridge
- Minecraft Bridge Scrims - What are They?
- How Do You Practice Minecraft Bridge Skills?
- Minecraft Bridge Duels - The Ultimate Showdown
- Learning the Basics of Minecraft Bridge Building
Building Your Minecraft Bridge - The Smart Way
When it comes to putting together a structure that spans a gap, like a bridge, figuring out exactly where each piece goes can feel a bit like a puzzle. There's a particular approach that helps you find the most suitable places to set down your building blocks. This method, it's almost like a precise calculation, helps determine the very best spots for each part of your structure, making sure it all fits together well. It even considers those smaller parts, like half-slabs, to get things just right, which is pretty neat.
This method has been put into a common online document system, so it’s something you can use quite easily. It’s been set up and adjusted to work in a popular document sharing platform, which means more people can get their hands on it and use it for their own building projects. So, you can open it up and see how it guides you through the process, making the whole thing less of a head-scratcher and more straightforward, you know?
When you start building, you'll see how the base of the structure comes together. The picture shows what the bridge looks like once the first layer, the foundation, is in place. This initial step is really important because it sets the stage for everything else you build on top. It’s like laying the groundwork for a solid path, ensuring your creation has a strong start. It helps you visualize the structure taking shape, too.
To get up to the main part of the structure, adding steps was a good idea for this particular build. You can, of course, choose whatever method works best for you to reach the main level. Perhaps you like ramps, or maybe a simple ladder would suit your style better. The choice is yours, really, so you can make it fit your personal building preferences. It’s about making it work for your own creative vision, basically.
For some builders, seeing the sides of a structure, especially a bridge, isn't always the look they want. This builder, for instance, prefers to have those parts hidden or perhaps blended into the surroundings. It's a personal touch, a way to make the build look just right for their taste. So, if you're building, you might consider how the sides of your structure will appear, and if you want them visible or not, you know?
What is the Best Way to Plan a Minecraft Bridge?
When thinking about how to plan your next minecraft bridge, consider its size. For a structure that will be two blocks wide, you need to pick the exact spot where you want it to go. Once you have that location in mind, you'll need to dig down three blocks from the surface. This creates the space for the base of your bridge, ensuring it sits properly. If that sounds a bit tricky to picture, looking at an example image can really help clarify what's needed, which is useful, really. This particular builder changed their mind on the exact spot, too, so it's okay to adjust as you go.
This builder is working on a specific mountain, which provides a natural setting for their creations. There's a distinct opening at the bottom of the mountain, and that's where the main entry point is located. It sets the stage for how you get into the area, you see. Higher up on this mountain, the plan is to add more structures that span gaps and a way to climb even higher. It’s all part of a larger building project, fitting into the natural shape of the land, you know?
The hole in the mountain, right at the base, is where people will enter this area. It's a key spot for access, leading into the larger build. Further up the mountain, the builder aims to put in more structures that connect different parts of the terrain and a path that goes upwards. It’s about creating layers of access and interesting places to explore within the mountain's natural form, you know, making the most of the landscape.
Advanced Minecraft Bridge Ideas
There's a special kind of structure that can move, like a retractable bridge, and this one is pretty advanced. It’s believed to be the first working suspended retractable bridge of its kind, which is quite something. This means it doesn't just sit there; it can pull back or extend, offering a different way to control access or create a surprise. It’s a really clever piece of engineering within the game, showing what's possible with a bit of thought and effort, too.
This particular moving structure stretches across a gap of four blocks, which is a decent span for a bridge. Underneath it, there are two open spaces. These spaces could be for water, or perhaps for other parts of a larger build, or just to create a sense of depth. It's designed to be functional while also looking quite impressive, especially when it moves. So, it's not just a static object; it has a dynamic element to it, you know?
Creating a Retractable Minecraft Bridge
To make a working retractable minecraft bridge, you need to consider how it will pull back and extend. This kind of structure often involves some clever use of game mechanics to achieve its movement. It’s about figuring out how to make parts of your build slide or fold away, revealing or closing off a path. It takes a bit of planning, and sometimes, a little bit of trial and error, but the result can be really satisfying, giving your base a unique feature, you know?
Thinking about the space under your retractable minecraft bridge is also important. Those two open spaces underneath could be used for various things. Perhaps they are part of a water feature, or maybe they hide some of the mechanisms that make the bridge move. They could also simply be empty areas that add to the visual design, making the bridge seem lighter or more airy. It's all part of the overall design, fitting into the larger picture of your build, basically.
Minecraft Bridge Scrims - What are They?
When players talk about "bridge scrims," they are referring to a really good place for those who are at a certain skill level, specifically step four. This is where players can practice and get better at specific moves within the game. It’s a structured environment where you can try out different ways of playing without the pressure of a real match, which is pretty helpful, you know? It’s all about getting more comfortable with certain actions and reactions.
One thing you learn in these practice sessions is when it's smart to quickly place many blocks, often called "blockspam," and when it's better not to. This is a key skill in certain game situations, as knowing when to build quickly can protect you or help you move faster. On the other hand, sometimes placing too many blocks without thought can get you into trouble. So, it’s about learning that balance, which is quite important.
You also learn when it’s a good idea to step back from a fight and wait for a teammate to join you. This is a tactical decision that can change the outcome of a skirmish. Sometimes, pushing forward alone isn't the best choice, and retreating to regroup with your partner can give you a much better chance. It's about teamwork and knowing when to pick your moments, which is a valuable lesson, too.
In these scrims, two teams start on separate landmasses. These landmasses are connected by a path that is only one block wide. This narrow connection makes things interesting, as it creates a clear choke point. The goal for the players is to get past the opposing team on this narrow path. It sets up direct confrontations and requires good movement and fighting skills to cross, making it a very focused kind of challenge, you know?
How Do You Practice Minecraft Bridge Skills?
Practicing minecraft bridge skills often involves specific techniques. One basic method is sometimes called "noob bridging" or "crouch bridging." This involves moving straight backwards while holding down the shift key and the right mouse button. It's considered the slowest way to create a path, but it's very safe and good for beginners. It helps you get the feel for placing blocks while staying secure, which is a decent starting point, you know?
There's another method that is very similar to "noob bridging," but it changes one small detail. Instead of just going straight backwards, this variation might involve a slight adjustment in movement or timing. It builds upon the basic idea of moving slowly and safely, but perhaps offers a tiny bit more speed or a different feel. It’s like a small step up from the very slowest method, offering a slightly different way to approach building a path, too.
Bridgersilk is a community that focuses on helping players get better at certain game actions, like "clutching," which is when you win a difficult situation. They offer training with computer-controlled characters or other players. They also help people practice building paths quickly, like "speedbridge" techniques. It’s a place where you can go to really hone those specific movement and building skills, making you a more capable player, you know?
This community also tracks progress through a system of achievements. For example, someone who achieves 50 wins in bridge-related activities earns the title "bridge rookie." If they reach 100 wins, they become a "bridge iron." These titles give players something to aim for and show off their dedication and progress in mastering these skills. It’s a way to recognize effort and improvement, which is a nice touch, basically.
Minecraft Bridge Duels - The Ultimate Showdown
When it comes to direct confrontations on those narrow paths, there's a really good set of instructions available. This guide is meant to be a complete resource for understanding "bridge duels." It’s presented as an amazing collection of advice, so you should get ready to spend some time reading and taking in all the information. It’s designed to help you become much better at these specific kinds of fights, giving you all the necessary tips and tricks, you know?
This particular collection of advice is put forward as the most complete guide for these "bridge duels." It means it covers everything you might need to know to do well in these one-on-one or small-team battles on narrow paths. It’s meant to give you a real edge, helping you understand the ins and outs of these intense matchups. So, if you want to improve your performance in these kinds of fights, this is the place to start, basically.
Learning the Basics of Minecraft Bridge Building
Learning the basics of minecraft bridge building involves understanding how to move and place blocks efficiently. For example, the "noob bridging" method, where you walk backwards while holding shift and the right mouse button, is a foundational technique. It's the slowest way to build, but it teaches you precision and safety. This is a very good starting point for anyone looking to get comfortable with building paths over gaps, you know, before trying faster, more risky methods.
Another aspect of learning bridge building comes from watching others. The content creator started out as a channel on a popular video platform, making videos about the game. These kinds of channels often show different building techniques, including how to make various structures that span gaps. Watching how others do it can give you a lot of ideas and help you pick up new ways to build, which is really helpful, too, when you're just starting out.
10+ Best Minecraft Bridge Ideas - TBM | TheBestMods
An older bridge design of mine. : Minecraft
A beautiful (and practical) simple bridge build I saw on Google, it
