Nose Drawing - A Simple Guide To Realistic Facial Features
Learning to sketch a nose might seem like a tricky part of drawing faces, yet it truly doesn't have to be a source of frustration. Many folks, especially when they're just starting out with art, find themselves feeling a bit stuck when it comes to getting this central facial feature just right. The good news is that with some straightforward tips and a bit of patience, you can absolutely begin to capture the varied shapes and forms of a nose, whether you're looking at it straight on, from the side, or at an angle. This little guide is here to walk you through how to approach this often-feared part of portraiture, making it feel much more approachable, you know?
You see, the secret to creating a nose that looks real and has depth really comes down to understanding its basic structure. It's almost like building something with simple blocks before adding all the fancy details. Once you can see the nose not as a single, complicated thing, but as a collection of simpler forms, putting it down on paper becomes a lot less intimidating. We'll be looking at how to break it down into these easier shapes, which, in a way, gives you a solid foundation for any nose you might want to draw, so.
This approach isn't just about making it easier; it's also about giving you the tools to draw all sorts of noses, from the very smallest to the most prominent, and everything in between. We'll talk about how different perspectives, like seeing a nose from the front, from an interesting angle, or in a straight profile view, can change how you tackle your sketch. Plus, we'll get into how light and shadow play a really big part in making your nose drawing pop off the page, giving it that genuine three-dimensional look, as a matter of fact.
Table of Contents
- Getting Started with Nose Drawing
- Why is Nose Drawing So Tricky?
- Breaking Down the Nose Drawing Process
- How Do Basic Shapes Help Your Nose Drawing?
- Different Views - Front, Angle, Profile
- What About Lighting and Shadows in Nose Drawing?
- Tips from the Experts on Nose Drawing
- Can Practice Really Improve Your Nose Drawing?
Getting Started with Nose Drawing
Beginning your journey into sketching noses can feel a bit like learning a new language, honestly. You're trying to communicate a form, a shape, a feeling, using just lines and shading. The initial steps are often the most important ones, setting up your entire drawing for success. When you're first getting started, it's pretty helpful to think about the nose not as a finished product, but as a series of connected parts, you know? This way of looking at it helps you to build it up piece by piece, which is usually a lot less overwhelming than trying to get the whole thing perfect all at once. We'll be going over some very simple initial pencil marks that can really guide your hand.
For instance, some folks find it useful to begin with just three simple lines on their paper. These are like little guideposts, helping you figure out where the nose sits on the face and what its general size and width might be. One line might go down the middle, showing the central axis of the nose, and then two others could mark out the width of the nostrils or the bridge. It's almost like drawing a very basic stick figure version of the nose before you add any flesh to it, that. This approach, in a way, takes a lot of the guesswork out of the initial placement, allowing you to focus on the structure without worrying too much about proportions right away, as a matter of fact.
These early guidelines are not meant to be permanent marks; they're just there to help you lay down the groundwork. Think of them as a very light sketch that you can easily adjust or erase as you go along. As you get more comfortable, you might find yourself needing these guides less and less, or you might develop your own personal set of starting marks. The main idea is to create a framework that supports the rest of your nose drawing, making sure everything is in its proper place before you add the more detailed shading and contours. It's really about giving yourself a helpful starting point, so.
Why is Nose Drawing So Tricky?
Many artists, especially those just picking up a pencil, often wonder why drawing a nose feels like such a challenge. It's a question that comes up quite a bit, actually. Unlike, say, an eye or a mouth, which have very distinct, almost graphic shapes, the nose is a bit more subtle, isn't it? It doesn't have a clear, defined outline that you can just trace. Instead, its form is created by very gentle curves, soft shadows, and how light hits its surfaces. This lack of sharp edges can make it seem pretty elusive to capture accurately on paper, you know?
Also, every single nose is just a little bit different, which adds another layer of complexity to nose drawing. There are so many variations – some are long, some are short, some are wide, some have a little bump, others are very straight. Trying to draw a "generic" nose often doesn't quite work because the features of a nose are so personal to each individual. This means you can't just memorize one way to draw it and apply it to every face. You really have to observe and adapt, which can be a bit more demanding than drawing other features, in some respects.
Then there's the fact that the nose sticks out from the face, meaning it's affected by light and shadow in a very particular way. It casts shadows, and it has highlights that change depending on where the light source is coming from. Getting these light and dark areas just right is absolutely essential for making the nose look like it's actually coming forward from the face, giving it that three-dimensional quality. Without careful attention to these tonal shifts, a nose can end up looking flat or even a bit strange, which is why it often feels like a puzzle to solve, pretty much.
Breaking Down the Nose Drawing Process
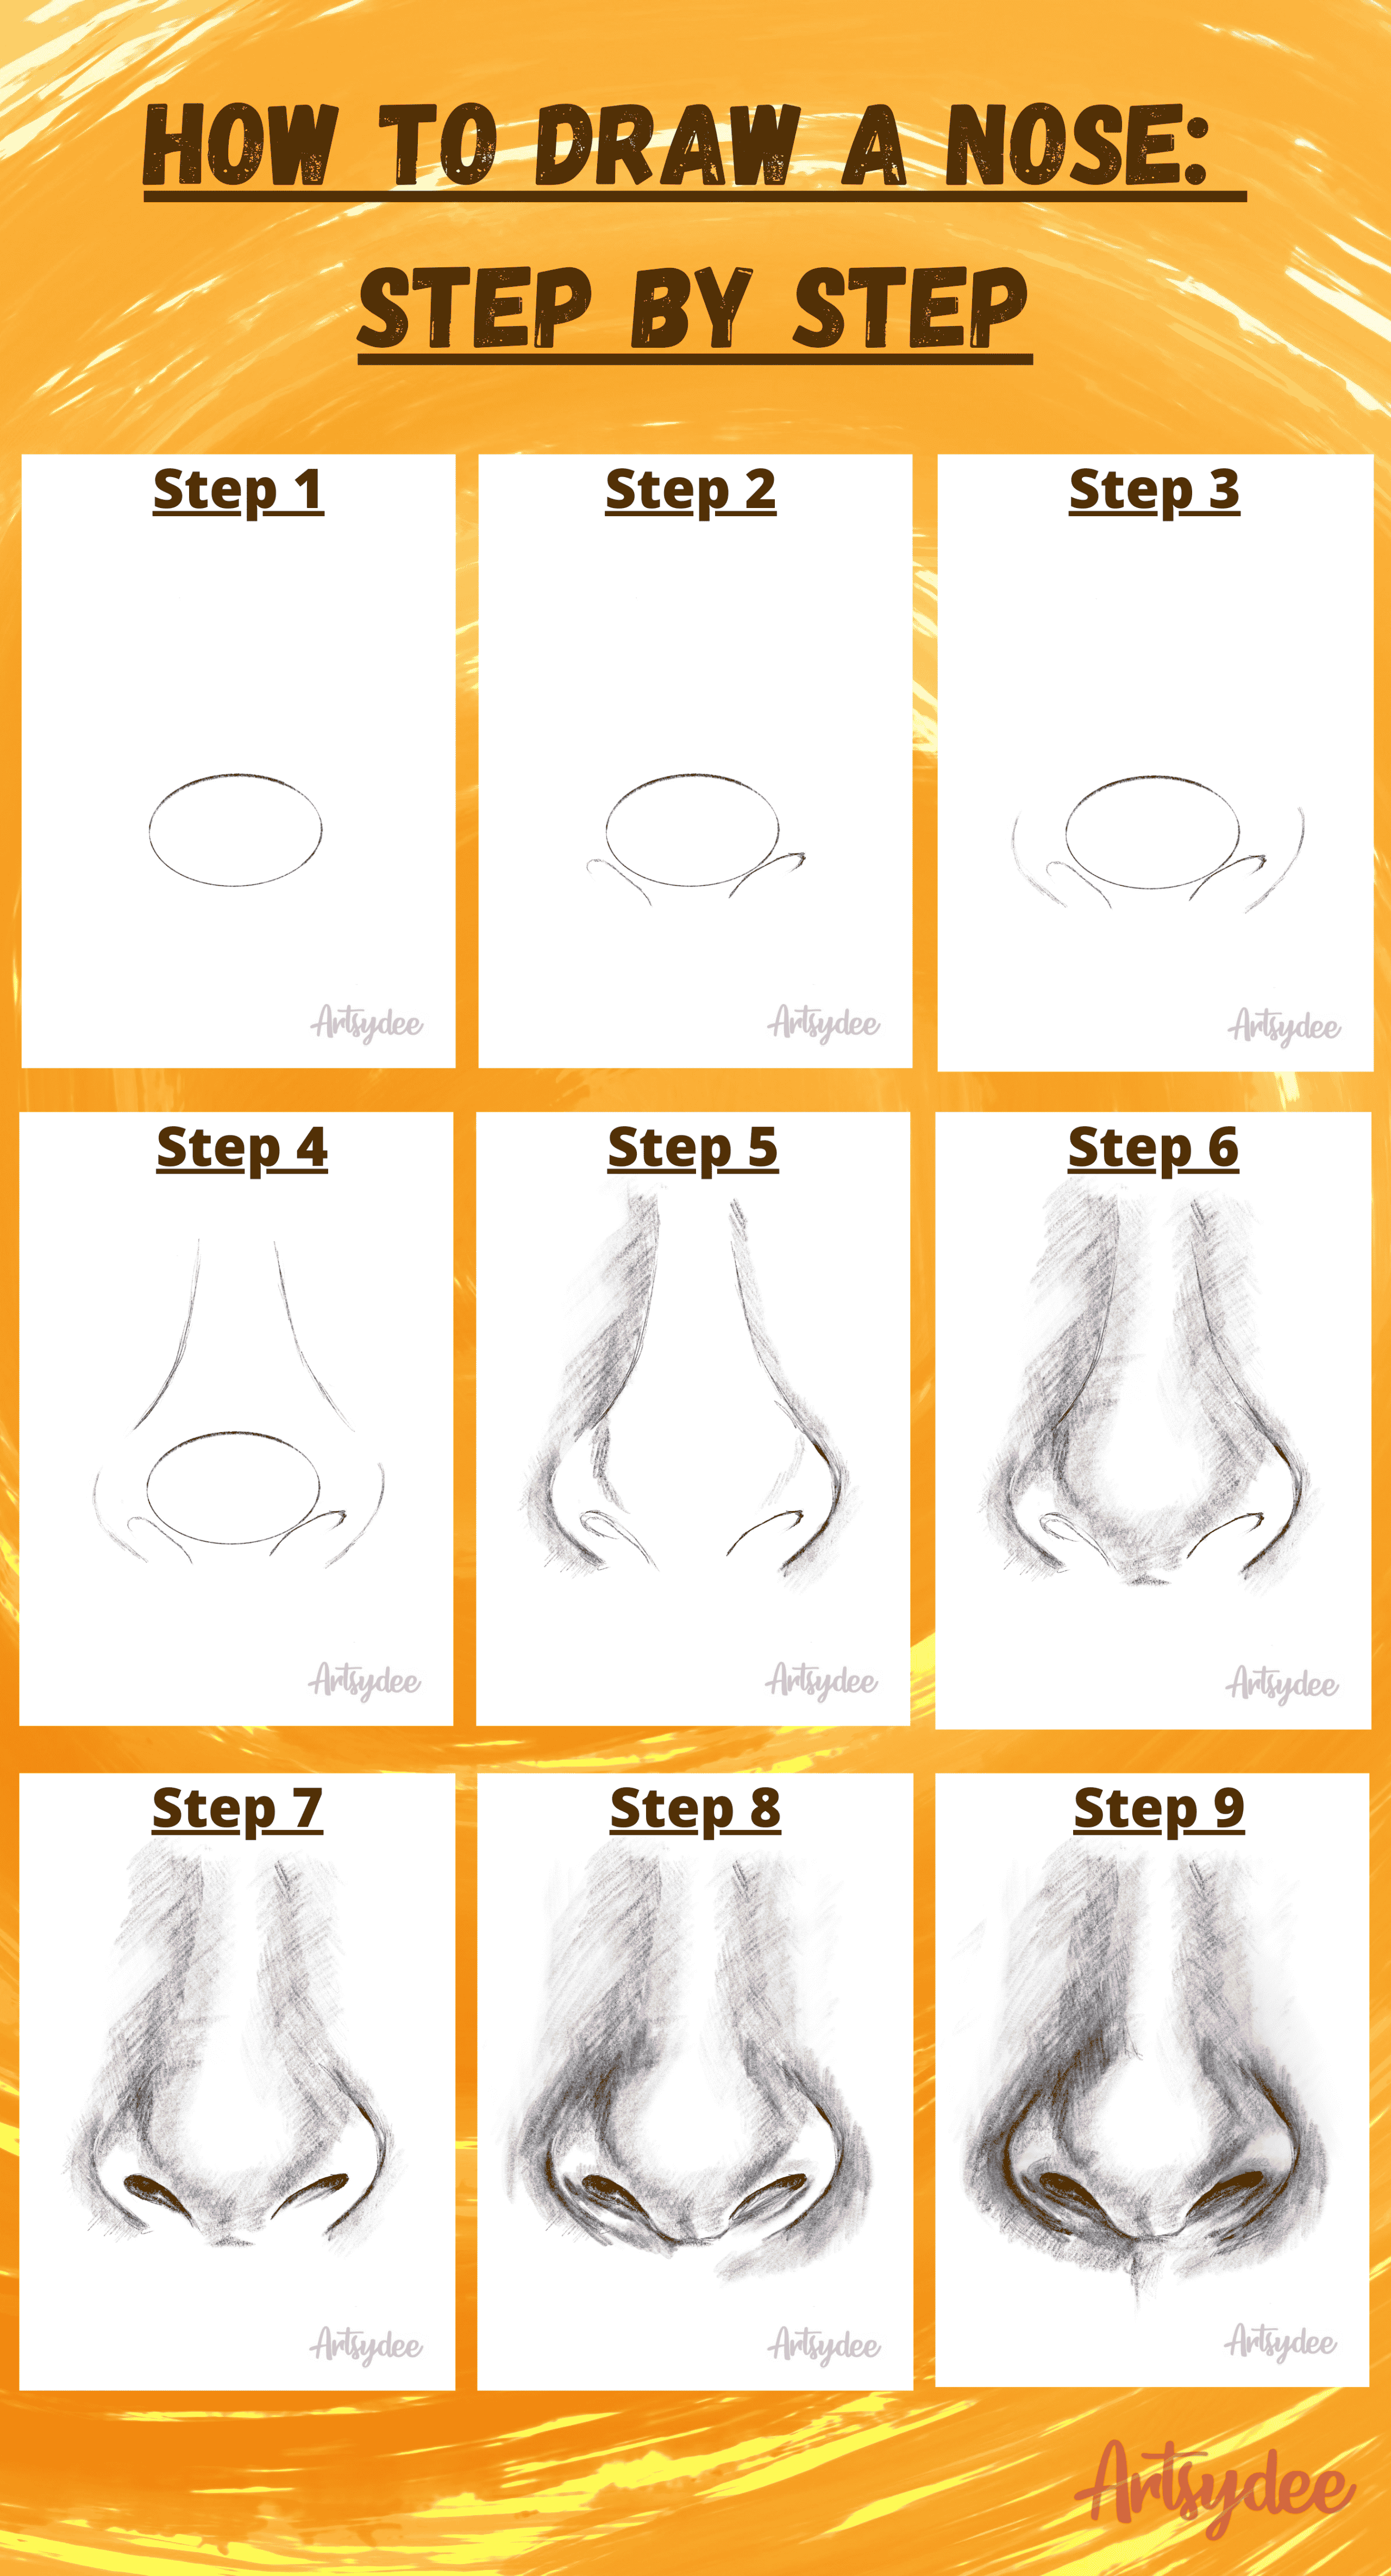
When you're trying to draw something as intricate as a nose, it really helps to think of it as a series of smaller, more manageable steps. This approach is something that many professional artists, like Sycra Yasin, often talk about in their lessons. Instead of trying to get the whole thing perfect in one go, you break it down into pieces, which makes the whole task feel much less overwhelming, honestly. It's a bit like building a house; you start with the foundation, then the walls, then the roof, and finally all the smaller details. Each step builds on the one before it, making the entire process more logical and, frankly, more fun, so.
The first step, as we touched on earlier, is usually about simplifying the nose into its most basic forms. Think of simple geometric shapes – maybe a sphere for the tip, a wedge for the bridge, and a couple of smaller shapes for the nostrils. This initial simplification is incredibly helpful because it allows you to get the general proportions and placement correct before you worry about any of the finer points. It's almost like creating a very rough sculpture of the nose before you start carving in the specific features. This foundational step is really what makes the nose drawing process much more approachable, you know?
After you have these basic shapes in place, you can then start to refine them. This means gently rounding off edges, connecting the different forms with softer lines, and beginning to suggest the subtle curves of the nose. It's a gradual process of moving from the general to the specific. You're not just drawing lines; you're thinking about how the different planes of the nose connect and interact with each other. This step-by-step method, according to artists like Raquel Arellano, allows you to build confidence as you go, seeing your nose drawing take shape little by little, as a matter of fact.
How Do Basic Shapes Help Your Nose Drawing?
You might be wondering, how exactly do simple shapes make a difference in something as complex as a nose drawing? Well, it's pretty straightforward, actually. When you look at a nose, your brain sees a lot of curves and subtle shifts. But if you can train your eye to see the underlying geometric forms – like circles, triangles, or even little cylinders – it becomes much easier to sketch. For instance, the ball of the nose, that soft, rounded part at the very end, can often be thought of as a sphere. The bridge, which is the part between your eyes, might be a bit like a wedge or a flattened box, so.
By breaking the nose down into these fundamental shapes, you're essentially creating a very solid blueprint for your drawing. It helps you get the proportions right and understand how the different parts of the nose connect and relate to each other in three-dimensional space. If you start with just a sphere for the tip, then add two smaller, slightly flattened spheres for the nostrils, and then connect them to a wedge for the bridge, you've already got a basic, believable structure. This method, honestly, takes a lot of the guesswork out of where to put your lines, which is often a big hurdle for people, you know?
Moreover, these basic shapes are a bit more forgiving to work with than trying to draw a perfectly smooth, curved line right away. If your initial sphere is a little off, it's easy to adjust it. If you try to draw the entire contour of the nose and it's wrong, it's much harder to fix without erasing a lot. So, by starting with these simple building blocks, you create a foundation that you can easily tweak and refine. This approach really helps you to focus on the overall form and volume of the nose before getting lost in the smaller, more intricate details of your nose drawing, pretty much.
Different Views - Front, Angle, Profile
Drawing a nose isn't just about knowing its basic structure; it's also about how that structure changes when you view it from different directions. A nose seen from the front looks quite different from one seen from the side, or even from a slight angle. Each perspective presents its own set of considerations for your nose drawing. It's almost like looking at the same building from three different streets – you'll notice different architectural details and how the light hits it in various ways, that.
When you're drawing a nose from the front, for instance, you're often focusing on the width of the bridge, the shape of the nostrils, and the overall symmetry. The challenge here is making sure it doesn't look flat. You need to use subtle shading to show that it's a form sticking out from the face, not just a flat shape on the paper. The light and shadow play a really big part in creating this sense of depth, giving the nose a sense of volume, so.
Then there's the angled view, which can be a bit more complex but also very interesting for nose drawing. From an angle, you start to see the curve of the bridge, how the nostrils recede, and the way the tip of the nose projects forward. This view really shows off the three-dimensional nature of the nose, and it requires a good understanding of perspective. You're essentially drawing a form that's turning away from you, which means some parts will appear shorter or more compressed than others, in a way.
Finally, drawing a nose in profile is perhaps the most straightforward for many people, but it still has its own nuances. Here, you're capturing the unique silhouette of the nose – whether it's straight, hooked, button-like, or has a gentle slope. The profile view really emphasizes the bridge, the tip, and the connection to the upper lip. It's a great way to practice capturing the individual character of a nose, as each person's profile is quite distinct, you know? Regardless of the view, understanding these different perspectives is key to making your nose drawings look believable and full of life, as a matter of fact.
What About Lighting and Shadows in Nose Drawing?
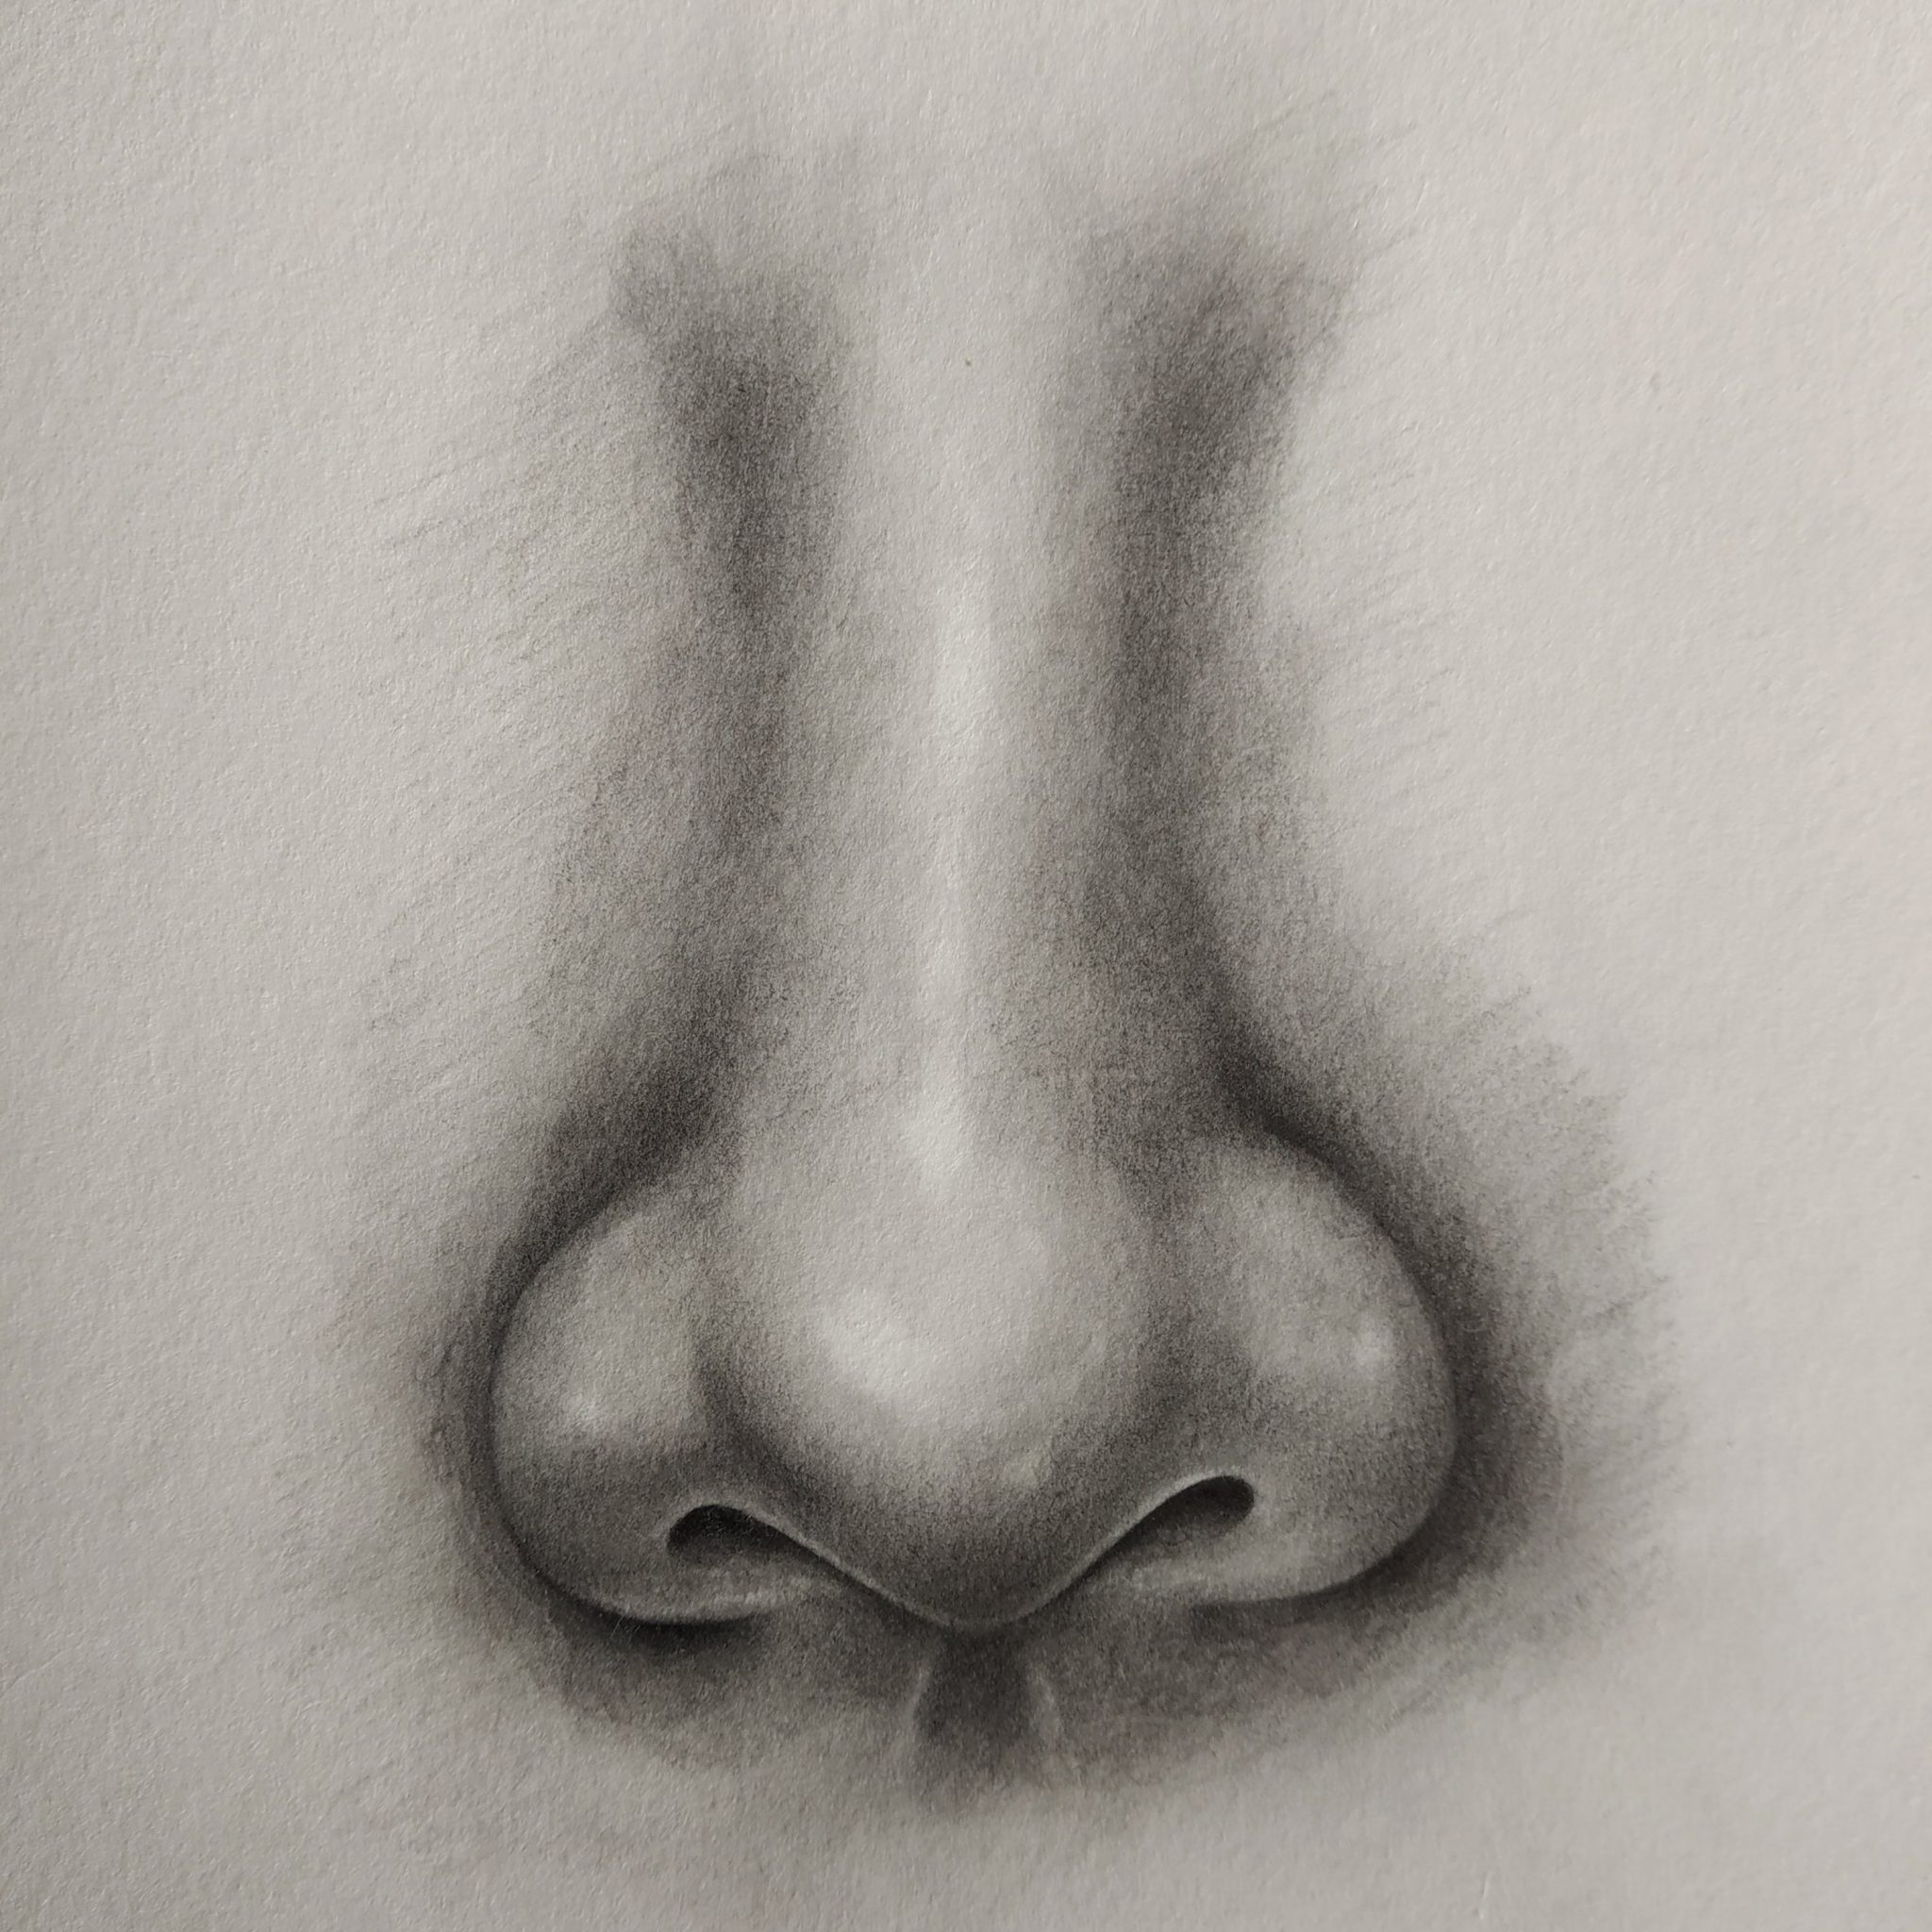
So, once you have the basic shapes and structure of your nose drawing down, the next big step is thinking about light and shadow. This is really where the magic happens, where a flat sketch begins to look like a real, three-dimensional object. Without careful attention to how light falls on the nose and where shadows are cast, even the most perfectly drawn outline will look flat and lifeless. It's almost like trying to describe a mountain without mentioning its peaks and valleys; you're missing the essential elements that give it form, that.
The nose, being a prominent feature, catches light in specific ways. The bridge will often have a highlight running down it, and the tip might have a brighter spot where the light hits it directly. These bright areas are crucial for making the nose appear to come forward from the face. Conversely, the areas underneath the nose, like the nostrils and the philtrum (the groove between the nose and the upper lip), will typically be in shadow. These darker areas create depth and help to define the underside of the nose, so.
Understanding where your light source is coming from is absolutely essential. If the light is coming from above, the shadows will be cast downwards. If it's coming from the side, you'll see one side of the nose lit up and the other in shadow, with a distinct cast shadow on the cheek. Practicing with different light sources can really help you get a feel for how these shadows behave. It's not just about making things dark; it's about making them dark in the right places and with the right intensity to create the illusion of form, you know?
Moreover, the edges of shadows are also very important. Sometimes they're sharp and defined, like the shadow cast by the tip of the nose on the upper lip. Other times, they're soft and subtle, like the gentle shading that transitions from the side of the nose to the cheek. These soft transitions are what make the nose look natural and rounded. Learning to observe and replicate these subtle shifts in tone and edge quality is a skill that will greatly improve your nose drawing, making it look much more realistic and vibrant, pretty much.
Tips from the Experts on Nose Drawing
When it comes to something like nose drawing, getting advice from those who have spent years perfecting their craft can be incredibly helpful. We've heard from professional artists like Kelly, and others such as Sycra Yasin and Raquel Arellano, who all share similar sentiments about the learning process. One common thread is the idea of breaking down complex forms into simpler ones, which we've talked about a bit already. This foundational understanding is something they really emphasize, as it allows for a more confident and accurate approach to drawing any facial feature, honestly.
Kelly, for instance, often points out that observing real noses is far more beneficial than just trying to copy other drawings. Each person's nose is unique, and by really looking at how light falls on different nose shapes, how the nostrils are formed, and how the bridge connects to the forehead, you start to build a mental library of forms. This direct observation helps you to understand the subtle variations and nuances that make a nose look believable. It's almost like becoming a detective of human anatomy, looking for clues in every face you see, that.
Sycra Yasin, known for his clear and engaging video courses, often suggests that artists focus on the "planes" of the nose. He encourages thinking about the nose not just as a rounded shape, but as a series of flat surfaces that catch light differently. Imagine the nose as if it were carved out of wood, with distinct flat sides. This way of thinking helps you to place your shadows and highlights more accurately, giving the nose a solid, three-dimensional feel. It's a very practical approach that helps you to simplify the form without losing its realism, you know?
Raquel Arellano, an illustrator whose work often breaks down complex subjects into understandable steps, also champions the idea of starting with basic shapes. She shows how, no matter the style – whether realistic or more stylized – the underlying structure remains the same. Her tutorials often illustrate how a few simple lines and shapes can evolve into a fully formed nose, step by step, with pictures to guide you. This reinforces the idea that even the most detailed nose drawing begins with a very simple framework, which is, in a way, quite reassuring for beginners, so.
Can Practice Really Improve Your Nose Drawing?
A question that often comes up is whether simply putting in the time and effort can truly make a difference in your nose drawing skills. The answer, quite simply, is an absolute yes. Just like with any other skill, whether it's playing an instrument, learning a new language, or even cooking, consistent practice is the most powerful tool you have for improvement. You wouldn't expect to play a song perfectly after just one try, right? Drawing is very much the same; it's a skill that builds up over time, pretty much.
Every time you sit down to sketch a nose, you're not just moving a pencil around; you're actually training your eye and your hand. You're teaching your brain to observe more closely, to understand proportions better, and to translate what you see in the real world onto a flat piece of paper. This kind of visual and motor learning happens incrementally. The more you draw, the more your hand gets used to making the right strokes, and the more your eye learns to spot the subtle details that make a nose look real, you know?
It's also worth remembering that practice doesn't always mean drawing a perfect nose every single time. Sometimes, practice means making mistakes and learning from them. Maybe one nose drawing looks a bit too wide, or another doesn't quite capture the angle you were going for. These "failures" are actually valuable lessons, showing you what to adjust next time. Over time, these small adjustments add up, leading to significant improvements in your overall ability to create a compelling nose drawing, as a matter of fact.
So, yes, dedicating time to drawing noses, even just for a few minutes each day, will absolutely improve your skills. You'll find that what once felt incredibly difficult becomes much more manageable, and eventually, even enjoyable. The more you practice, the more confident you'll become in your ability to capture this challenging facial feature from any perspective, and with a variety of shapes and styles, so.
This whole discussion has really been about making the art of nose drawing feel less like a mountain to climb and more like a series of gentle hills. We've gone over how breaking the nose down into simple shapes can make a huge difference, whether you're looking at it from the front, from an angle, or in profile. We also touched on how important light and shadow are for giving your drawings that real, three-dimensional look. And, of course, we talked about how experts like Kelly, Sycra Yasin, and Raquel Arellano all agree that practice is your best friend when it comes to getting better. It's all about taking those initial steps, using some basic guidelines, and just keeping at it, because, honestly, with a bit of time and effort, you can absolutely create noses that look truly lifelike and expressive.
Easy Things to Draw Easy to Draw Nose Step by Step - Anderson Theshe
How to draw nose (front view)? | LOV4ARTS | Easy drawing techniques

How To Draw A Realistic Nose in 4 Simple Steps - Udemy Blog
